


Salam to all readers
Wah entry cik Dil pasal photoshop lagi.hehe
Biasa lah, tengah cuti.
So, ada la sikit masa nak main-main dengan photoshop.
Walaupun assignmnet berlambak,
tapi bila kat rumah mood nak buat assignmnent tu kurang sikit..hehe
Hari ini cik Dil akan ajar pasal
"Soft High Contrast Photo Effect"
Selamat mencuba okay.
Macam biasa tutorial cik Dil,
in English..
BEFORE

credit to Mr Google
AFTER

STEP 1
Open your picture in Adobe Photoshop
Duplicate background layer (Ctrl+J)

STEP 2
Choose Image>Apply Image


STEP 3
Create a new Selective color layer
Neutrals: 11, 3, 9, 0
Stamp visible all layers ( Ctrl+Shift+Alt+E)

STEP 4
Choose Channel Pallete
Ctrl+A to choose Green channel,
Ctrl+C to copy it and
press Ctrl+V to paste it into Blue channel

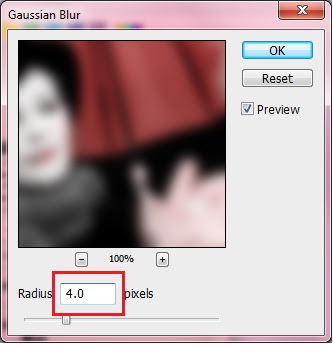
STEP 5
Stamp visible all layers ( Ctrl+Shift+Alt+E)
Apply Gaussian blur
Filter>Blur>Gaussian blur

STEP 6
Set this layer to Soft light

STEP 7
Ctrl+U to reduce the red tone


STEP 8
Stamp visible all layers ( Ctrl+Shift+Alt+E)
Apply Gaussian blur
Filter>Blur>Gaussian blur
Set this layer to Hard light, 20


STEP 9
Create new Selective color layer
Reds: 86, -23, 12, 0
Whites: 0, -21, 0, 0


Done
nota kaki:
kalau korang perasan muka model ni,
macam terlampau putih pula.
so, korang boleh rendah kan opacity
dekat layer yang menggunakan mode soft light.
Okay, selamat mencuba..
(^_*)
nice2! gud job. ^^
ReplyDeletenti nk try. hehe
@Farien:hehe..try laa..hehee
ReplyDeletebest..boleh try nanti..suke tutorial photoshop
ReplyDelete@nazirah..try hgn xtry..okess..hehehe
ReplyDeletewahh nice..i loike lah
ReplyDeletewa~ ssh, nk download fotokedai pun lambat
ReplyDelete@wani brahim :hehe..tq
ReplyDelete@ Ratu Sulaman: xsusahh pon.hehe
AWK..SY NAK BLAJA JGKA..MCM MNE YE..HUHU
ReplyDelete@kyra:awk ushar2 laa tutorial nii..smple je..senang
ReplyDeleteohh, sy akan try nt..thnks ye
ReplyDeletecayalah cik dil
ReplyDelete@ Kyra Hasman: heheh
ReplyDelete@ mOhd Hafiz:g2 lak.hehe
good effort...bcome ur followers la :)..like!
ReplyDeletexjadi pown.. *frust*
ReplyDeletexfhm yg nk amik selective layer 2..huhu..