


Salam to all readers..
Akhirnya cik Dil mengupload tutorial cik Dil yang ke berapa ntah..hehe
Dah lama sangat kan cik Dil tak share pasal photoshop kan..
cik Dil sibuk sangat-sangat sejak masuk sem 3 ni..
So tetiba tadi masa on day way balik dari Koku, dapat ilham nak ajar korang pasal
"How to Create Retro Comic Book Effect "
Apa kejadah pulak tu??
err camne ye nak cakap??
Alaa, korang tengok jelaa tutorial yang cik Dil dah siapkan ni..
Senang sikit korang nak fahm..hehe
So, selamat mencuba..
Macam biasa, tutorial yang cik Dil siapkan ni,
in English (sebab susah nak Malay kan term-term yang dalam dalam photoshop)
BEFORE

Credit to Mr Google for this picture
AFTER

STEP 1
Open the picture in Adobe Photoshop.

STEP 2
Go to IMAGE > ADJUSTMENTS > LEVELS
Set the INPUT LEVELS to 60 / 1.00 / 220

You will get the result as shown in the screenshot below

STEP 3
After that, go to FILTERS > ARTISTIC > FILM GRAIN
Set
GRAIN: 4
HIGHLIGHT AREA: 0
INTENSITY: 10

You will get the result as shown in the screenshot below

STEP 4
Duplicate the background layer (Ctrl+J)
Go to FILTER > PIXELATE > COLOR HALFTONE
Set MAX RADIUS: 4 and leave the rest with the default values

You will get the result as shown in the screenshot below

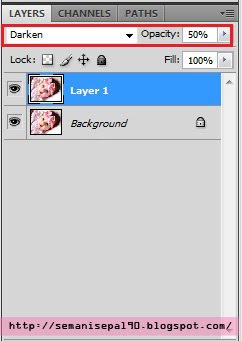
STEP 5
Change the Blending Mode to DARKEN and OPACITY to 50%

Done..
Nota kaki:
Okay, dah siap..
Macam mana, okay tak effect ni??
Eh korang, maaf lah, English cik Dil tak bagus sangat..
Maklumlah, cik Dil dah 21 tahun hidup kat Malaysia ni..hehehhe
Selamat mencuba ye..
SEBARANG KOMEN DAN KRITIAN AMATLAH DIHARGAI
comel giler
ReplyDeleteanak sape laa tu
Mereka ini sangat GOJES !
Peristiwa itu masih menhantui diriku...
Nak Lagi Pendrive MURAH ?
anak cik dil laa..hehehe
ReplyDeleteerk..tul ke anak tu...apsal putih semacam jek...hehe
ReplyDelete@ o'gosh: biasa laa..bapaknyaa matsalleh..hahaha..2 anak putihh..huuuu
ReplyDeletesalam cik dil..nad guna tutorial ini dan nad copy letak kat blog nad..:)
ReplyDeletenad akan delete tau kalau cik dil kata delete..:)
new entry :: How to Create Retro Comic Book Effect ツ