


Salam to all readers..
Hari ini cik Dil nak ajar korang
1 lagi effect menggunakan Photoshop..
iaitu
"Photo Retouch Adding Lip gloss"
Effect ni simple je,
Tapi hasilnya tetap cool..hehe
korang boleh touch up bibir korang dengan mengunakan bermacam-macam colour..
Okey, kat bawah ni, adalah hasil bibir yang cik Dil dah touch up kan..
Korang boleh tengok and try..
macam biasa tutorial yang cik Dil sediakan ni in English
*korang abaikan grammar cik Dil yang lintang pukang tu k..hahaa
Bukan apa,
susah la nak convert kan term-term yang ada dalam photoshop to BM..
nanti silap-silap korang tak faham..hehe..
Okey, selamat mencuba..
BEFORE

AFTER

STEP 1
Open your picture in Adobe Photoshop.
Duplicate background layer (Ctrl+J)

STEP 2
Select Magnetic Lasso tool
click around the lips on the outer edges as shown in the image below

STEP 3
Then hold Atl and click the inner side of the lips as shown below

You should got the result as shown below

STEP 4
Click on the gradient tool
choose Spectrum
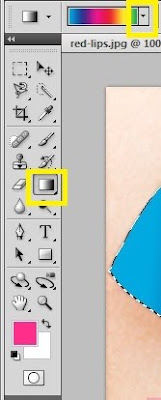


Your setting be like this

STEP 5
Dragging out a radial colour gradient from left to right in the image
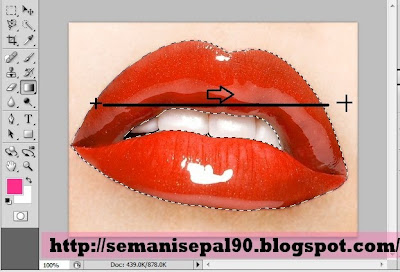
You should got the result as shown below

STEP 6
Change the blending mode to Hue


Done
nota kaki:
best kan dapat touch up bibir dengan pelbagai warna..
so lepas ni, tak payah la nak beli lipstik lagi..hohoo..
SEBARANG KOMEN DAN KRITIKAN AMATLAH DIHARGAI
salam..kamu taw x cne nak wat kotak comey2 untuk sidebar?:)
ReplyDeletestill blurr gune Adope5..aiyoyo..
ReplyDeletexcelik it btoi~hehe
@ cahaya : kotak2 camne 2??kalau cik Dil tauu, cik Dil kan tlg..hehehe
ReplyDeleteain: adobe 5??wahhh makin best.cik Dil gune adobe 4 je..lum smpat nk upgrade lg..hehehe
cerita sedih,,is still xleh nk instal adobe,,huhu
ReplyDeletecomei2, bibir pelangi ;)
ReplyDeletehehhe..tryy laa wak..
ReplyDeleteoooo..photoshop pnyer efect jerkerr..tgk iklan lipstik ingtkan betol la lipstik effect..hahaha..
ReplyDelete@juli: ahaa..pakai photoshop pon boley..so, xpyh pelik laa kalauu tgk iklan lipstik yg pelik2 2..hehehe
ReplyDeletehebat
ReplyDeletenok wat lagu mano? ergh buat-buat paham sudah laaa
ReplyDeletewahhh bibir pelangi...
ReplyDeleteJom baca dan komen post terbaru Blur Fakta Menarik Part 3
@imram nyambek :sukaa nama pena awk..hahaha..
ReplyDelete@cemomoi:laa, kan dah list kan step2 die 2..follow je..
wow..pelangi pun ada bibir..chumel...bolehj try jugak ni.hehe
ReplyDelete@sipara-para: slmt mcuba ye..huhuu
ReplyDeletewah..bibir nampak menyerlah...cntik la kamu buat..
ReplyDeleteThis comment has been removed by the author.
ReplyDelete@lolaa : hehe..tq2..
ReplyDelete@anne : yeke..nak tgk...hehhe
wow menarik! mau try nnt ;D
ReplyDeletewah..bestnyaaa...leh main make-up2 la nnt kat photoshop...wink2~ -[test ur brain]-
ReplyDeletecik dla bibir u ke tu..hahah
ReplyDelete@nizam uishh en nizam..bukan laa..tu model cik dila je..hahaha
ReplyDeletedats gud tutorial for those still amatur....
ReplyDeletehohoh thx... nice share.. 6ti nk bt kat bbir kte.. hehehe
ReplyDeletenice 1!
ReplyDeletethanks! saya berjaya :D
ReplyDeletehaa tua dah caman orang buat katalog lipstic tu..hohohooho.
ReplyDeletewaaa..tomey le awk ni. tite nak follow tp tbe2 tite takot plak nengok nomot geng2 awk tu. hee bdw, nice tutotial! and and and..err tite follow lah ye!! hehehe =)
ReplyDeleteda try. lawa gilaa ^^, but, ta bole save. haihh. knpe eah ? photoshop i ta bole save ?
ReplyDeleteblending mode kat mane?
ReplyDeletecik dil, mcm mana nak tambah corak kita sendiri dekat gradient tu?
ReplyDelete