


Salam to all readers
Wah akhirnya..
cik Dil dah boleh update blog..
Maklumlah, 2 3 minggu ni asyik bz dengan midterm..
Fuhh fenatt..
Okey lah,
untuk entry kali ini,
cik Dil nak share pasal VINTAGE..
vintage tu ape eh??
kalau cik Dil terangkan kat sini,
mmg pnjg bjela entry cik Dil..
Macam ni laa,..
korang google je laa vintage tu ape ehh..
*malas tol cik Dil nii..
Tutorial ari ini adalah
Vintage | How to Create Sunburnt Effect
Macam biasa,
tutorial in English.
BEFORE
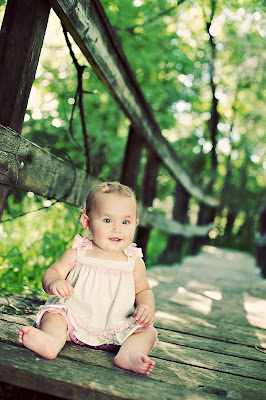
http://maggieholmes.typepad.com
AFTER


STEP 2
Insert Levels
Image>adjustment>Levels
Set the setting as shown in screenshot below

STEP 3
After that, insert Hue/saturation.
Image>adjustment> Hue/saturation.
Set the setting as shown in screenshot below


STEP 4
Create new fill layer
Layer> new fill layer>Solid
Set the setting as shown in screenshot below


STEP 5
Create Selective Color
Image>adjustment>Selective Color
Set the setting as shown in screenshot below


STEP 6
Insert Curves
Image>adjustment> Curves
Adjust the curves based on your picture.


Done
nota kaki:
okay, dah siap pun tutorial untuk kali ini..
simple kan..
oh ya,
ada yang mengadu,
tutorial cik Dil susah nak faham.
Betul ke?? -.-"
ni photosop edition bpe? sy pnye tak ade yg latest
ReplyDeleteade photoshop 7.0 je?
tp tetap tak tau gune :(
Shira Afya Hashim
ReplyDeletephotoshop cs4 je..ohh..tukar laa..pakai laa yg cs..lg snang
ecah x reti gune ps...gune photoscape jek..hehehe
ReplyDeleteapsal dia jadi benda yang menakutkan.dah tomei dah budak tu
ReplyDeletecomeynyer budak kecik tue...
ReplyDeletesaya paling lemah kalau bab curves tu.huhuhu
ReplyDeletecik dil kembali dengan entry baru
ReplyDeletesusah part nak adjust curves tu.fuh bepeluh peluh
ReplyDelete